
IBM App Connect Enterprise already has the right runtime model for event-driven integration. The lab illustrates how to publish a business event, how to consume it back safely, and how to keep the design easy to retarget from a local broker to IBM Event Streams.
This article keeps the lab deliberately small. We will:
- Start a local Kafka-compatible broker with Docker
- Create two Kafka topics
- Build one ACE flow that receives HTTP and publishes an event
- Build a second ACE flow that consumes the event and republishes an audited copy
- Validate the result from the command line
- Identify exactly what changes when the same integration is pointed at IBM Event Streams
For this lab, the runtime example uses the free IBM App Connect Enterprise for Developers Docker image from icr.io.
1. Lab goal
By the end of this lab you should be able to:
- Explain how ACE uses KafkaProducer and KafkaConsumer nodes in a simple event flow
- Separate flow logic from runtime connection details by using a Kafka policy
- Validate topic traffic from outside ACE
- Understand which parts stay unchanged when moving from a local lab to IBM Event Streams
2. Software you need
For this lab, use:
- IBM App Connect Enterprise for Developers Docker image (
ibmcom/ace:latest) - App Connect Enterprise Toolkit installed locally on your workstation
- Docker Engine and Docker Compose plugin
If Docker is not installed on your machine, follow the steps in Appendix A — Installing Docker before continuing.
If you do not already have the App Connect Enterprise Toolkit installed, obtain it through IBM App Connect Enterprise Developer Edition. The download requires a free IBM account.
IBM reference:
Installing and starting ACE Developer Edition on Linux
Download the .tar.gz archive from the IBM link above and extract it:
tar -xzf ACE-*-LINUX64-DEVELOPER.tar.gz
cd ace-12.0.x.x
Accept the licence and set up the environment:
sudo ./ace make registry global accept license silently
source /opt/ibm/ace-12.0.x.x/ace_env.sh
Start the Toolkit:
./ace toolkitOn first launch, select a workspace directory when prompted and if necessary, open the Integration Development perspective via Window → Perspective → Open Perspective → Other.
3. What we will build
ACE message flows and nodes
An ACE message flow is a directed graph of processing nodes. Each node performs one step: receiving a message, transforming it, routing it, sending it to an external system. The Toolkit is the authoring tool where you place and wire nodes together. After deploying the flow, the ACE runtime executes it.
Nodes communicate by passing a message tree that is a structured in-memory representation of the message headers, body, and environment. Each node can read the tree, modify it, or replace it before passing it to the next node. ESQL Compute nodes let you reshape the tree precisely before it reaches a transport node like KafkaProducer.
The two transport nodes relevant to this lab are:
- The KafkaProducer node serialises the current message body and publishes it to a Kafka topic. As ACE handles the Kafka producer client lifecycle internally, your flow logic does not manage connections or retries directly.
- The KafkaConsumer node functions as a continuous trigger. It polls a Kafka topic on a configurable interval, and for each message it receives it initiates a new flow execution. From the flow's perspective, it is the entry point, the equivalent of an HTTP Input node, but event-driven rather than request-driven.
The two-flow, two-topic pattern
The lab uses two flows and two topics deliberately. Understanding why that shape matters is more important than the code that implements it.
POST /orders
  -> Compute
  -> KafkaProducer
  -> HTTPReply

KafkaConsumer(topic ace-out)
  -> Compute
  -> KafkaProducer(topic ace-audit)
  -> Trace
Flow 1 bridges a synchronous HTTP request to an asynchronous event. The caller gets an immediate reply. The business event (the order) is now on a Kafka topic where any number of downstream systems can consume it independently, at their own pace, without the caller knowing about them. This is the core of event-driven decoupling: the producer of the event and the consumers of it are not coupled in time or in code.
Flow 2 represents a downstream processor. It consumes the event, adds its own metadata, and republishes an enriched copy to a second topic. The second topic (ace-audit) is separate from the first (ace-out) so that the original event is preserved unchanged. Anything that needs the raw order reads from ace-out. Anything that needs the audited, processed copy reads from ace-audit. A single topic carrying both forms would couple the audit logic to every consumer that reads the original.
This will be enough to illustrate both directions of ACE Kafka interaction without making the article dependent on a large environment. The authoring will be done in the Toolkit and the runtime used for the lab will be the container but from the IBM ACE developer image.
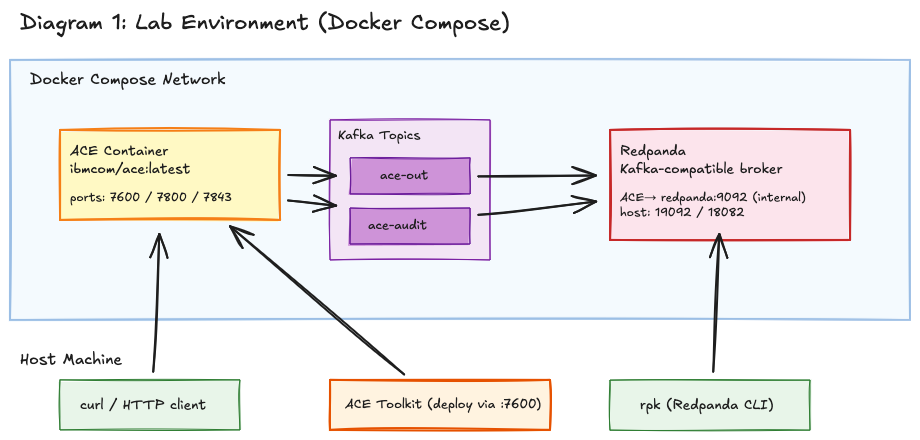
4. Create the local lab environment
Why Redpanda for a Kafka lab
The compose file below uses Redpanda as the local broker instead of Apache Kafka. Redpanda implements the Kafka wire protocol in full and a client that speaks Kafka (and this includes ACE's KafkaProducer and KafkaConsumer nodes) cannot tell the difference at the protocol level. Topics, consumer groups, offsets, publish-and-consume semantics, and the bootstrap negotiation that ACE performs when it starts a flow all work identically. Every interaction you test with Redpanda translates directly to IBM Event Streams, which is itself built on Apache Kafka.
The practical reasons for choosing Redpanda here are:
- No ZooKeeper. Apache Kafka requires a ZooKeeper ensemble (or a KRaft quorum in newer releases) alongside the broker. Redpanda is a single self-contained process, which keeps the compose file short and the startup fast.
- No registry authentication. The Redpanda developer image pulls from Docker Hub without credentials. The ACE developer image does the same. The entire lab starts with one
docker compose up -dand no prior login step. - Built-in
rpkCLI. Therpkcommand is bundled inside the Redpanda container. It lets you create topics and consume messages directly withdocker compose execwithout installing a separate Kafka client on your machine. - Designed for local dev. The
--overprovisionedand--mode dev-containerflags in the compose command tune Redpanda for a single-node, resource-constrained laptop environment. A standard Kafka broker needs more tuning to behave well under those conditions.
However Redpanda does not replace is the IBM Event Streams-specific configuration: TLS certificates, SCRAM credentials, IAM tokens, and the schema registry integration that a production Event Streams deployment uses. None of that is relevant for our lab. Section 10 covers exactly what changes when you point the same flows at IBM Event Streams.
Preliminary setup
Create a working folder:
mkdir -p ~/ace-eventstreams-lab
cd ~/ace-eventstreams-lab
Create a docker-compose.yaml file defining the ACE and Redpanda nodes:
cat > docker-compose.yaml <<'EOF'
services:
  ace:
    image: ibmcom/ace:latest
    depends_on:
      - redpanda
    environment:
      LICENSE: "accept"
      ACE_SERVER_NAME: "ACESERVER"
    ports:
      - "7600:7600"
      - "7800:7800"
      - "7843:7843"

  redpanda:
    image: docker.redpanda.com/redpandadata/redpanda:latest
    command:
      - redpanda
      - start
      - --overprovisioned
      - --smp
      - "1"
      - --memory
      - "1G"
      - --reserve-memory
      - "0M"
      - --node-id
      - "0"
      - --check=false
      - --kafka-addr
      - internal://0.0.0.0:9092,external://0.0.0.0:19092
      - --advertise-kafka-addr
      - internal://redpanda:9092,external://localhost:19092
      - --pandaproxy-addr
      - internal://0.0.0.0:8082,external://0.0.0.0:18082
      - --advertise-pandaproxy-addr
      - internal://redpanda:8082,external://localhost:18082
      - --mode
      - dev-container
    ports:
      - "19092:19092"
      - "18082:18082"
EOF
Start the lab environment:
docker compose up -dConfirm that both containers are up and running (wait and repeat until they are operational. This will take some time because the images need to be pulled in):
docker compose psCreate the two topics used in the lab and confirm they exist:
docker compose exec redpanda rpk topic create ace-out
docker compose exec redpanda rpk topic create ace-audit
docker compose exec redpanda rpk topic list
5. The ACE policy project and the policy
What is a Kafka policy and why does it matter
In ACE, a policy is an XML artifact stored in a Policy Project that externalizes configuration from a message flow. A Kafka policy specifically holds the connection details that ACE's Kafka nodes need to reach a broker: the bootstrap server addresses, the security protocol, and when security is enabled , credentials, TLS settings, and SASL mechanisms.
Without a policy, you would need to embed those details directly in each KafkaProducer and KafkaConsumer node and that would make maintenance and promotion of the flows between environments harder.
With a Kafka policy, the flow node holds only the policy reference and at runtime, ACE resolves that reference and uses the connection details from the policy instead of from the node itself. The BAR file for the flow is the same in every environment. Only the deployed policy changes.
A message flow should encode business logic and data transformation. It should not encode where the broker lives, what port it uses, or how authentication works. The policy is what keeps those two concerns apart.
In this lab, the policy reference looks like this:
{EventStreamsPolicyProject}:LocalKafkaPolicywhere EventStreamsPolicyProject is the name of the Policy Project you create in the Toolkit and LocalKafkaPolicy is the name of the individual Kafka policy inside it. Every KafkaProducer and KafkaConsumer node in the lab uses the same reference. If you later point the lab at IBM Event Streams, you update LocalKafkaPolicy or deploy a new one for the target environment and the flows require no changes.
One design-time detail to be aware of: the Toolkit requires a value in the Bootstrap servers field on each node before it will save the node. That value is not used at runtime when a policy is attached as the policy overrides it, but it must be present. For this lab, we set it to redpanda:9092 on every node.
Create the project and the policy
In the Toolkit:
- Create a new Policy Project called
EventStreamsPolicyProject - Add a Kafka policy called
LocalKafkaPolicy - Configure it for the local lab broker:
Bootstrap servers: redpanda:9092
Security protocol: PLAINTEXT
We use redpanda:9092 and not localhost:19092 because the ACE runtime runs inside the Docker network, where it reaches Redpanda by its service name. localhost:19092 will still be used to communicate from the host machine (for curl and rpk commands).
For this local lab, we keep the policy intentionally simple. Do not mix in TLS, SCRAM, or IAM yet.
6. Create the ACE application
What the nodes in these flows actually do
Before building the flows, it is worth being precise about what each node type does.
- The HTTP Input node opens a listener on the ACE HTTP server. When a request arrives at the configured path (
/orders), the node deserialises the request body and places it into the message tree underInputRoot.JSONand the flow starts executing. There is no polling. The execution is triggered directly by the inbound HTTP connection. - The Compute (ESQL) node is the transformation step. ESQL is ACE's built-in language for working with the message tree. The node runs the ESQL module you associate with it so that after the Compute node, the message tree contains whatever you put in
OutputRoot. The next node in the flow will see that, and not the original request. - The KafkaProducer node takes the current message body at
OutputRoot.JSON.Data, serialises it, and publishes it to the configured topic. The node handles the Kafka producer lifecycle: maintains a connection to the broker, handles partition selection, and waits for the broker acknowledgement before propagating the message to the next node. The flow does not proceed to the HTTP Reply until the broker has confirmed the publish has been done. - The HTTP Reply node sends the HTTP response back to the caller. By the time this node executes, the produced event is already on the Kafka topic. The reply is deliberately minimal in this lab. In a production flow you would typically include a correlation ID or a status body.
- The KafkaConsumer is a trigger node. ACE polls the configured topic on a configurable interval and when a message arrives, the node places it into the message tree and the rest of the flow executes. A KafkaConsumer flow is a continuous background process and has no caller waiting for a reply. The consumer group ID you configure on the node is what Kafka uses to track which messages this particular consumer has already processed. If you stop and restart the flow, Kafka picks up from where it left off for that group ID.
- Consumer groups deserve a specific note. A consumer group is a named group of one or more Kafka consumers that collectively consume a topic. Kafka assigns partitions to consumers in the group. If a flow is scaled to multiple instances, all instances with the same group ID share the work each message being processed by exactly one instance. If you use a different group ID, each instance gets every message independently. This lab uses a single consumer with group ID
ace-eventstreams-demo. - The Trace node writes a formatted log entry to the ACE integration server log. In this lab it records that the audit flow processed a specific order. It is the simplest form of observability, confirming that the second flow ran and can be inspected.
Build the application
Create an application called AceEventStreamsLab.
Inside it, build two message flows:
Flow 1: HTTP to Kafka
Create a flow called HttpToKafka.msgflow with these nodes:
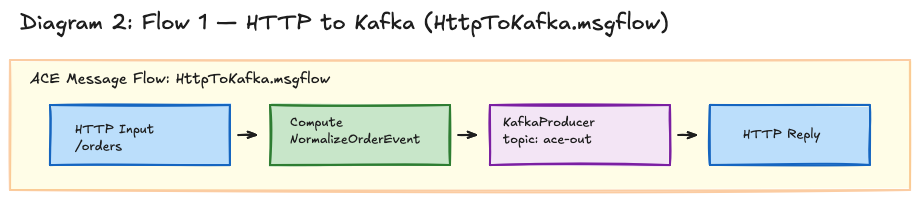
Suggested configuration:
- HTTP Input
- Path suffix:
/orders
- Path suffix:
- KafkaProducer
- Topic name:
ace-out - Bootstrap servers:
redpanda:9092 - Kafka policy:
{EventStreamsPolicyProject}:LocalKafkaPolicy
- Topic name:
In the application, create a new ESQL file called NormalizeOrderEvent.esql and paste this code into it:
CREATE COMPUTE MODULE NormalizeOrderEvent
  CREATE FUNCTION Main() RETURNS BOOLEAN
  BEGIN
    CREATE LASTCHILD OF OutputRoot DOMAIN 'JSON';

    SET OutputRoot.JSON.Data.eventType = 'OrderCreated';
    SET OutputRoot.JSON.Data.source = 'ACE';
    SET OutputRoot.JSON.Data.orderId = COALESCE(InputRoot.JSON.Data.orderId, '');
    SET OutputRoot.JSON.Data.customer = COALESCE(InputRoot.JSON.Data.customer, '');
    SET OutputRoot.JSON.Data.amount = COALESCE(InputRoot.JSON.Data.amount, 0);
    SET OutputRoot.JSON.Data.currency = COALESCE(InputRoot.JSON.Data.currency, 'EUR');
    SET OutputRoot.JSON.Data.processingNote = 'Published by ACE to topic ace-out';

    RETURN TRUE;
  END;
END MODULE;
Then open the Compute node properties and set the ESQL Module field to NormalizeOrderEvent (use browse and select).
Flow 2: Kafka to Kafka audit
Create a second flow called KafkaAudit.msgflow with these nodes:
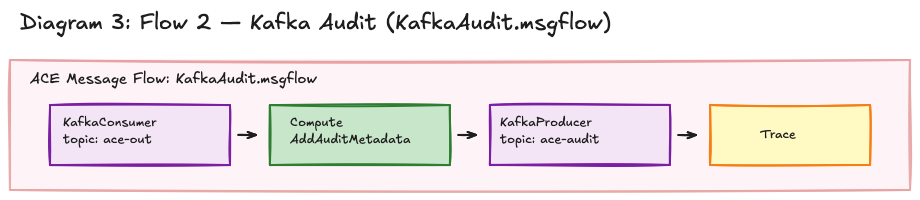
Suggested configuration:
- KafkaConsumer
- Topic name:
ace-out - Bootstrap servers:
redpanda:9092 - Consumer group ID:
ace-eventstreams-demo - Kafka policy:
{EventStreamsPolicyProject}:LocalKafkaPolicy
- Topic name:
- KafkaProducer
- Topic name:
ace-audit - Bootstrap servers:
redpanda:9092 - Kafka policy:
{EventStreamsPolicyProject}:LocalKafkaPolicy
- Topic name:
Create a second ESQL file called AddAuditMetadata.esql with the code below:
CREATE COMPUTE MODULE AddAuditMetadata
  CREATE FUNCTION Main() RETURNS BOOLEAN
  BEGIN
    CREATE LASTCHILD OF OutputRoot DOMAIN 'JSON';

    SET OutputRoot.JSON.Data = InputRoot.JSON.Data;
    SET OutputRoot.JSON.Data.auditStage = 'Consumed and republished by ACE';
    SET OutputRoot.JSON.Data.auditFlow = 'KafkaAudit';

    RETURN TRUE;
  END;
END MODULE;
Then open the Compute node properties and set the ESQL Module field to AddAuditMetadata.
Set the Trace node pattern to something small and readable, for example:
Kafka audit flow processed order ${Root.JSON.Data.orderId}7. Deploy the application
What deployment means in ACE
When you deploy from the Toolkit, it packages your flows and resources into a BAR file (Broker Archive) and sends it to the integration server over the administration API. A BAR file is a ZIP archive that contains the compiled flow binaries, any ESQL modules, and other resources the flow depends on. The integration server unpacks it and starts the flows.
Policy projects are not bundled into the application BAR. They are deployed as separate artifacts. This is intentional: the same application BAR can run in development, test, and production the only thing changing between environments being the deployed policy. That separation is the whole point of externalising connection details into a policy.
The deployment order matters for that reason. When the ACE runtime loads a flow that references {EventStreamsPolicyProject}:LocalKafkaPolicy, it looks up that policy from the set of currently deployed policies. If the policy is not there, the node cannot initialise its Kafka connection and the flow fails to start. Deploying the policy project first guarantees it is present before the flows that depend on it are loaded.
Before you can deploy from the Toolkit, you need to connect it to the integration server running in the Docker container.
In the Toolkit, open the Integration Servers view. Right-click and choose Connect to an Integration Server. Enter the following connection properties:
Hostname: localhost
Port:     7600
Leave the security fields blank for this local lab. The port 7600 is the ACE administration port exposed by the Docker Compose setup.
Once the connection is established and the server appears in the view, deploy in this order:
- Right-click
EventStreamsPolicyProjectand select Deploy. Wait for it to complete. - Right-click
AceEventStreamsLaband select Deploy.
After deployment, the POST /orders endpoint will be available on port 7800.
8. Test the publish path
Send one business event into ACE:
curl -X POST http://localhost:7800/orders \
  -H "Content-Type: application/json" \
  -d '{
    "orderId": "SO-1001",
    "customer": "ACME",
    "amount": 125.50,
    "currency": "EUR"
  }'
Consume one message directly from the source topic:
docker compose exec redpanda rpk topic consume ace-out -n 1You should see the normalized event produced by ACE.
9. Test the consume-and-audit path
Now let’s validate the second flow. Consume one message from the audit topic:
docker compose exec redpanda rpk topic consume ace-audit -n 1If the second flow is active, you should see the same business event with the extra fields:
auditStageauditFlow
It proves that:
- ACE published to Kafka
- ACE consumed from Kafka
- ACE republished a derived event
That is already a valid event-driven integration pattern, even though the business logic is deliberately small.
10. What changes when you move to IBM Event Streams
The important point is that the message flow design does not need to change. Some necessary runtime changes are:
- Replace the local bootstrap server
redpanda:9092with the IBM Event Streams bootstrap servers - Move from
PLAINTEXTto the appropriate secure configuration - Add the required credentials and, if necessary, truststore material
- Redeploy the updated Kafka policy and credentials
11. Practical production lessons
Use policies, not hard-coded broker values
Do not put environment-specific broker details in every node. Keep that in the Kafka policy so that moving from dev to test to production is a runtime concern, not a flow redesign.
Scaling has ordering consequences
IBM documents three main ways to scale Kafka consumption in ACE:
- additional flow instances
- multiple deployed flows in the same consumer group
- multiple Kafka connections
That improves throughput, but it can also affect ordering expectations. If ordering matters, treat scaling and commit behaviour as part of the functional design, not just runtime tuning.
Keep the first flow boring
The best first ACE and Event Streams integration is not a complicated one. It is a short path that proves:
- Connection
- Topic write
- Topic read
- Traceable transformation
Once that path is stable, then add schema validation, error routing, retries, dead-letter handling, and stronger security.
12. Key takeaways
- ACE Kafka nodes are enough to build a clean first event-driven integration
- A local Kafka-compatible broker is a good way to validate the flow shape before moving to IBM Event Streams
- The Kafka policy is the critical seam between flow logic and environment configuration
- A publish flow plus a consume-and-audit flow is a better first lab than a large end-to-end scenario
- Moving to IBM Event Streams should mainly be a configuration change, not a redesign
IBM documentation
For deeper IBM-specific details, use these official references:
- Using Kafka with IBM App Connect Enterprise
- Connecting IBM App Connect to IBM Event Streams
- KafkaConsumer node
- Producing messages on Kafka topics
- Consuming messages from Kafka topics
- Configuring security credentials for connecting to Kafka
- Policies overview
- Scaling messages with Kafka
Appendix A — Installing Docker
If Docker Engine and the Compose plugin are not already present on your machine, use the commands below for your distribution. Run these steps before starting section 2.
Ubuntu / Debian
sudo apt-get update
sudo apt-get install -y docker.io docker-compose-plugin
sudo systemctl enable --now docker
RHEL / Rocky / Alma / CentOS Stream
sudo dnf -y install dnf-plugins-core
sudo dnf config-manager --add-repo https://download.docker.com/linux/rhel/docker-ce.repo
sudo dnf install -y docker-ce docker-ce-cli containerd.io docker-buildx-plugin docker-compose-plugin
sudo systemctl enable --now docker
Verify the installation:
docker version
docker compose version
Both commands should return version output without errors. If docker compose version fails, the Compose plugin is not installed — re-run the install command and check the output for errors.